

 |
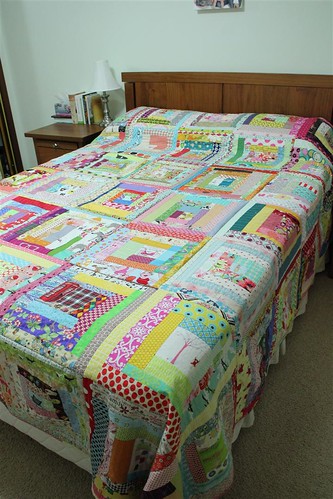
| Aka to make one of these…. |
I first came across QAYG blocks and the technique over at Rita’s Red Pepper Quilts blog very shortly after I’d started sewing in 2010. Being new to sewing, and recognising that while I’d LOVE to do a big quilt, I really couldn’t see me ever having the courage to do it, couple with the fact that I loved the scrappy look of the blocks she was making, I thought this idea was genius! She had made them using a tute over it at Penny from Sewtakeahike’s blog.
So naturally I clicked over to have a nosey, as you do, and low and behold but Penny was having a quilt along. Cue me making this quilt here using Penny’s technique exactly….
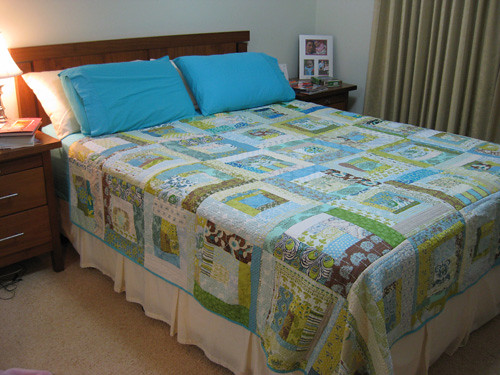 |
| You can read all about it here… and here… |
A technique which I totally love and that I’ve used over and over and over for SOOOO many different projects e.g. my scrappy pouch pattern.
But after making an entire queen sized quilt using that technique, I knew from experience that it takes a LONG time.
And a LOT of stamina.
(And a LOT of thread)
Since I didn’t have a lot of the first 2 requirements and I already go through about 1000m of thread per week at times, I made an executive decision and do it slightly differently this time.
– I decided to instead make the entire block first and then quilt them to the wadding after the block was already made.
{Ok, lets be honest – I decided to invite my bloggy friends to make the blocks for me so that I could totally tap into my ultimate laziness reserves. But let’s not get too technical heheheh….}
Then I also figured that I could quilt it in any which way I liked.
You could use this method to quilt any kind of block, it doesn’t have to be a log cabin block, it just so happens that I really like log cabins and decided to make another one but this time just using colour.
{Tutorial here if you’re interested in making scrappy log cabins too}
Here is the method which I use to Quilt as you Go (QAYG).
It has pros and cons like any other method, but in my (humble) opinion I think the pro’s far outweigh the cons and I know without a shadow of a doubt that I will go on to use it time and again. Because it is manageable!
In which case here we go, let’s get started!:
Step 1: Make your quilt blocks…
As already stated, you can make pretty much any block design and size block you like to do QAYG. So off you go and make enough of whichever blocks are floating your boat right now 😉
Log cabins do work out to be convenient though because it’s best that you make your blocks slightly bigger than you require for your final size and trim them down after they are quilted. So log cabins are easy to do this too without spending much time fluffing about measuring…
– I wanted my final blocks to measure 15 inches cut, so I just made sure that each block measured very comfortably over 15 inches. You don’t want to be too scrimpy because you will potentially lose some size when you quilt. So it is really best to make them bigger.

K, made all your blocks? Let’s move on…
Step 2: Time to baste your blocks…
Once you have all your blocks made, or the first batch or whatever, then it’s time to baste them to your wadding of choice. I spray basted them to make the process even more lazy quick, but I guess you could also pin them. In fact, I didn’t even baste the last 5 and that seemed to work ok too, but shhhh don’t tell anyone I said so ;).
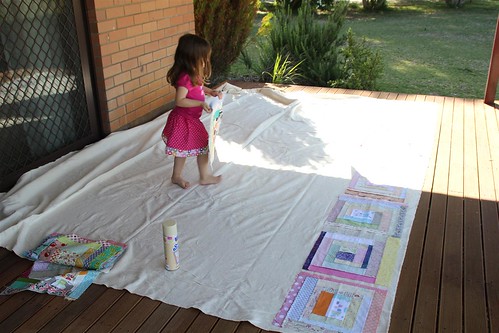
It’s pretty easy to spray baste if you’ve never done it before (as long as you don’t mind the smell) – take a bunch of quilt batting outside to a surface you don’t mind spraying on & follow the manufacturers directions for your spray baste. You don’t need that much…
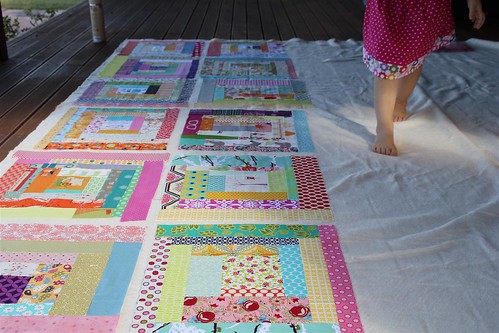
I laid a bunch out upside down on a huge piece of batting, sprayed them all and then flipped them over one by one, leaving a border of batting of at least an inch around each block…
 |
** Note;
In other tutorials I have read they recommend using a lightweight quilters muslin as a back to your blocks when you are quilting them. This makes it a lot tidier for your machine so that the batting fluff doesn’t mess it up.
But since I’m a) cheap and b) lazy I didn’t bother with putting a backing on the blocks for either of my QAYG quilts while I was quilting them and instead just opted for quilting with just the top block & the batting underneath it.
But just be warned that if you decide to also forgo this step (like me) then it will make your machine more fluffy & require cleaning slightly more regularly.
It’s really not that big a deal though – I just made sure I gave my machine a little brush out every time I changed the bobbin and then every 3-4 changes I took my bobbin holder out (top loading) and cleaned it a bit more thoroughly.
You would need to oil it at this point too if your machine is one that requires oiling.
Once your blocks are all basted (& the back is on if you are using the muslin option), then you roughly cut around the blocks leaving the batting at least 1 inch bigger than your block.
No need to be neat when you are trimming because as stated we will trim them down soon! Just hack it up baby 😉

Step 3: Quilting your blocks…
Now we should have a nice stack of piles to quilt, you can get busy quilting…
You can quilt your blocks any which way you desire at this point whether that be straight-line or free motion.
I choose to quilt mine using straight lines – half the blocks I quilted the lines going vertically & half I quilted horizontally so that I could lay them out like a checker board when putting it all together and it wouldn’t matter that none of my lines matched up. Smart huh 😉
I did not measure or mark my lines, and I did not do them evenly spaced. This IS, after all, a scrappy quilt that I was making right?! So I just lined my presser foot up and used the edge for a guide (but there was quite a large gap between the side of the presser foot & the fabric edge. Then I used that line as a guide and just placed the lines at random intervals and so on… too easy. My lines probably varied from 1/2 inch to 1 1/2 inches apart.
I know that probably gives some of you shivers down your spine at the thought of potentially “wonky” lines, but I’m going more with the term “organic” and it really suited the style of the quilt I was making.
Close up of my quilting:
 |
| See how the block at the bottom (green strip) has vertical lines & the dog block has horizontal. And that’s what I mean by they are not evenly spaced… I just did what suited each block/fabric print. |
Sorry I didn’t take any photos of the actual quilting part, because I thought you could do your own thing.
Quilting done? Yeah!
Time to cut them down to size…
Step 4: Trimming…
Lay your ruler over your block in place you think works best.
Cut it down to size (in my case 15 inches)…


Done. Too easy.
Now, I was cutting mine down to 15 inches using a 15 inch ruler, so it was pretty easy to figure out just by turning my mat and leaving the ruler in place. But you can easily do the same without a square ruler, you’ll just have to use the guides on your mat…
Stand back and admire your tidy looking block 🙂
Step 5: Making your layout & preparing them to join together…
Find a spot on the floor big enough lay your blocks out in your desired layout.

Once you are sure you have them laid out where you want them, take a bunch of pins, a pen and a bunch of small paper. You will need as many pieces of paper as you have rows.

Number your pieces of paper 1 to whatever (as in whatever number is the total number of rows you’ve made – in my case 7) and pin them to the far left blocks, starting at the top and working down, number each block.

Now we need to collect them up into piles…
Start at the bottom (although it doesn’t really matter) and place the far left block that you have numbered on top of the one to it’s right.
Then pick up both of those blocks and place them on top of the 3rd block in that row…
Pick up all 3 of those blocks and place them on the fourth…
etc…
etc…
until you have them all in a nice neat pile with the row number on top.
Do the same for each row until you have (whatever amount of) all your piles stacked up nicely with their numbers on top.

Step 6: Joining the blocks into rows…
 |
| My numbered piles all ready to be sewn together |
Take your first two blocks. Lay them right sides together and join them together on the right-hand side of the first block (so that when you open them back out again they are in the correct order) with a 1/2 inch (or bigger) seam.
{You want to make the seam a little more generous than the usual 1/4 inch just to give it more strength.}

Add the 3rd block to the right-hand side of the second block and so on and so on until you have your row completely sewn together.

This is why it is important to work left to right because the bulk of your blocks is always to the left and you don’t end up having to squeeze them all through the arm of your machine. Magic!
Once you have finished piecing your rows throw them all on the floor Gently fold them up and place them nicely on the floor or hang them over the back of a chair 😉 and start on the next row until you have all 7 rows pieced together…
 |
| Heheh this picture is taken after I’ve already ironed them actually – up until then the chuck them on the floor bit – that’s me – but shhhh don’t tell 😉 |
… You need to prepare them next for sewing together by ironing the seams open…
Now usually I’m a “press-to-the-sider” (sheer laziness because it’s faster), but this is definitely a time when you want to press the seams open! As pictured…

** Note: I’ve found that irons & batting don’t traditionally like each other much in my experience – even my 100% cotton batting tends to get a little “grippy” with my iron, so you might want to do a little test first before you power away here and wreck your iron. Especially if you’re not using natural fibres!
My way to overcome this is to fill my iron up as full as I can with water & press the steam jet button continuously as I go, moving rapidly but blasting those babies with steam to set the seam open… I find that method works for me.
Otherwise, you could try oven proof paper? I just don’t like that option as much because it just adds more fiddliness and I couldn’t see what I was doing.
Your call… Just be aware of the potential “sticking” problems that’s all.
Step 7: Joining the rows together to make the top…
First, let me say here that I’m not a ‘pinner’. So if you are, then insert your own pinning option here as necessary 😉
Take either rows 1 & 2 or rows 6 & 7 and place them on top of each other right sides together. Line up the edges and also line up the seams of the first blocks so that they nest nicely on top of each other.
Sew them together using a 1/2 inch seam again.
I find that if I hold my first seam together with my right hand, then use my left to guide, then my seams match up nicely. I just stop just after each one and nest the next seams together, now holding those ones and so on (if that makes any sense…)
 |
| nesting my seams… |

Once you have sewn those two together then add the next row to those 2 and so on until you’ve sewn half of your rows together.
Then work on sewing the other half together.
Once you have sewn all of those halves then you can sew those two halves together to finish your entire top.
{Just makes it less heavy that way!}
Righto, go have fun with your steam jets again and steam the other seams all open.
So it should look roughly like this…
 |
| ooops spot the mistake in my quilting? Two blocks next to each other with vertical lines… tut tut tut Kat. I left it there. – Life goes on… |
{just do me a favour and try not to burn yourself with all the steam – it might take some of the pleasure out of the finish 😉 )
Step 8: Basting….
This is where you throw everything you’ve ever learnt about basting a quilt out the window…
– The whole taping the back to the floor and laying the batting then the top down on it rigmarole that is.
Yep the basting of this quilt could not be more straight forward, but we are going to break the norm and pin from the back.
Really – not a typo… – we really truly pin from the back.
So lay your quilt top down on the floor right side down, with all your seams at the top.

You shouldn’t need to tape it or anything, it has enough weight & we are only pinning together 2 layers and that one finds itself hard to wrinkle, so no worries there.
Place your quilt back over the top, right side up (so you should have wrong sides together).
Because we are only stitching in the ditch around the blocks this is why you can pin from the back; because if we are careful about where we place our pins then we don’t have to remove any of them as we quilt, but it’s easier to smooth out the back really nice (since the front is already smooth and quilted 😉 )
I pin about 3 inches in from each corner. So that’s 4 pins per 15-inch block…
Starting in the middle place a pin in each corner (but not too close to where you can feel the seams) taking care to smooth out the back really smooth as you go.
Continue to that to each block, smoothing the back as smooth as you can by pushing all the wrinkles out to the edges.
 |
| Mine looks a little more wrinkled than it should simply because I’ve had two “helpers” dancing all over it! But it’s tight, trust me. |
Step 9: Stitching in the ditch…
Now we want to secure our two layers together by stitching in the ditch around the blocks. So start in one of the middle ditches and sew down the ditch all the way from top to bottom.
 |
| (Really missing big Brother right about now since Miss Pfaff has a smaller arm on her! But we got there and she did well! :)) |
Do the next ditch along, and the next one etc… until you’re at the edge (I don’t go down the outside edge though because it’s more work don’tcha know and the binding will see to that anyway… 😉 )
Then turn your quilt around and starting in the middle do all the ditches on the other side.
Once you’ve finished all the ditches vertically (or horizontally) then turn your quilt and do the opposite ditches.
You should end up with nice big squares on the back like this…
I bet at this point, if you are making a huge quilt like I did, that you will be extremely pleased you only have to quilt a few of these lines because you did QAYG!! LOL…
Once you’ve done all the ditches the back will look like this:
 |
| Hopefully, these are enough – it’s a bit hard to capture the back… |
So as you can see the back is very plain compared to the front. Which I know some see as not ideal. But for me, it’s perfect as a bed quilt because it’s so much more smooth against my skin and I sleep better. And really, how often do you look at the back?
Step 10: Securing the middle of each block…
Traditionally when people make these, they also secure the middle of the block in some fashion.
I’ve seen that some people tie the middle. – I have no experience in that sorry so you’ll have to do your own research there… 🙂
For my first one, I decided to free motion a little heart in the centre(ish) (in other words wherever it best fit each block) to anchor it in the middle. That worked fine…
 |
| Can kind of see one of my free-motion hearts in the middle there… |
However, for my cheeky quilt, I haven’t yet done anything to anchor the middle. Because at the time I assembled it my main sewing machine was in the shop being fixed and I wasn’t confident enough to do free motion on my back up sewing machine. But you know what – I actually find it fine without that little anchor. So far I don’t know if I’m going to add anything.
So see how you go, you might decide you don’t need to either.
Step 11: Bind as you normally would…
Here is where it reverts back to “normal” if you would, and you can go ahead and bind in whatever fashion you’d normally do.
For me, that was raiding my scrap bin for any strips of 2.5inches wide and making a scrappy binding. Except I made WAY too much because I was too lazy to do the math. (But as it happened I had the perfect amount left over to bind this quilt, so all was not lost).
I’ll put a tute up of how I do my machine binding soon (next time I bind something and remember to take photos as I go no doubt ;)) for those that have asked me for it.
Step 12: Stand back and admire the fact that you made a huge big quilt and quilted it all by yourself…
Go you!!
Frequently asked questions:
Won’t the seams feel bulky doing it this way?
Well if you compare it to a traditional quilt, then yes, they do slightly. If you run your hand down your seam then you will notice a slight raise, but I find that you really do have to go looking for them. I bet unless I told you that my two quilts were QAYG then you wouldn’t pick it from just looking at the top (obviously if you saw the plain back you’d be like – hey, what the?).
But I imagine it would also depend on the wadding/batting you use. Mine is not particularly high loft. Nor low. Probably medium loft 100% cotton batting. So I’d just recommend that you didn’t use a really high loft one…
Does the back feel really loose & gape?
You can pull the layers apart from each other if you try to, especially if you don’t anchor the middle like I didn’t in my second. But otherwise I have found that they still have just as nice a drape and I don’t even notice it. It will also depend on what sized blocks you do as well, mine are pretty massive!
If you think that this will potentially bother you though then you could always add another line of stitching down the middle of each block in each direction so that you have smaller quilted squares. I’m sure that will eliminate much of that potential gape yet still be reasonably easy to finish on your domestic machine while maintaining a densely quilted front.
Will it fall apart more easily?
Well I guess again part of that will depend on your construction & the quality of your materials used ;). By using a 1/2 inch seam to sew the blocks together I have not found any problems whatsoever.
I used the first quilt I made on my bed for an entire year, with regular washing since most of that time we didn’t use a top sheet due to hot weather. And it has held up perfectly fine from a block aspect.
{Although I must admit that a couple of the seams on the blocks on my first quilt have come away from each other over time – but that will be more to do with my wonky sewing because I was just learning at the time and probably couldn’t sew a straight seam 😉 – That could happen with any type of quilt! LOL}
Hmm… that’s all I can remember for now, but I’ll update this with any that you ask after this post 🙂
I hope you enjoy!
As always if you try this technique I’d love to see and admire your project!! 🙂
Take care

Amazing! I wish I had seen this before I started my current project. It would have saved me a lot of headaches! I’ll have to try it on my next “larger” project. Thanks for the tutorial!
love your style of writing, Kat. Even though I am not a quilter and stumbled upon this tute while looking for other things, I continued to read it.
Thanks for the Tut. i have never tried a QAYG…have saved your Tut so I can try it out.
Thanks for going to so much detail! I might need to give this a try, maybe on a scrappy quilt too!
Great tut! I have always avoided qayg but would like to give it a go now 🙂
Thanks for an absolutely fabulous tutorial! You have inspired me to try the QAYG method.
Great tutorial Kat. I really like the sound of it, and will try it on my next big quilt.
Thanks heaps xxxxx.
Cool, thanks for sharing!
Thanks for the wealth of info! I’ve given vague thoughts to making a quilt for our bed, but I never quite felt like I knew enough about quilt-as-you-go to even give it serious consideration. Now I’ve got one less excuse!
Great tute – thank you my dear x
Lovely tutorial, thank you for sharing all of your tips and hints. Your quilts are really lovely.
Thanks for a really helpful tutorial! Since I make only huuuge quilt tops I’m going to try your method. I think it will really appeal to me, making life easier!
whoa Kat! You are like some psychic lady!
I lay in bed last night wondering if my new quilt pattern idea would work as a QAYG block by block … hehehe … thank you!
You might juar have inspired me to get off my sofa and go cut some fabric!
Kat, this is really great! I had NO idea really what folks were talking about RE QAYG (beyond the obvious) and this took the mystery out. Would think about doing this at some point. Thanks!
I’ve done a variation on this by quilting bigger units as I go, and then attaching the next part, since I’m pretty comfortable quilting baby-sized quilts. I like to go ahead and add the backing so it is quilted too, and then I just join the three layers by folding back the part I don’t want to sew. So, I’ll leave an inch at the edge not quilted, put the new piece of backing fabric down on the back right sides together, and sew my seam just holding the batting and top out of the way to the left. Then I fold the back away, butt my batting together and zigzag. Then I add my next row/unit for the front right sides together, but sewing through the back and batting like you would on a turn-and-flip placemat, which gives me a little more quilting. It’s fussier in some ways, but I never have to put the whole quilt back through my machine, because I’m just continuing out from the center. Does that make sense? I’ll be doing this method again sometime soon on a t-shirt quilt for my fiancée so I’ll try to take some pictures and write a tutorial, in case you want a “not-smooth-back” version (or just want to play with a different technique!
This is exactly what I’ve been looking for! I’m ready to go on the QAYG but didn’t know exactly where I was really going!! Thanks for your detailed explanation! Will be trying it out tomorrow actually!
Did you ever publish a post on your method? This is exactly what I’ve been looking for and am having a hard time envisioning how you accomplished this.
Here is a lovely British lady that has a tutorial for this method. I am making blocks for a king size now and am going to do a modified version. The quilting starts at about 7 min. Up til then she teaches you how to make the strips.
https://www.pinterest.com/pin/17029304811926092/. I hope this link works.
My modification plan is to cut the backing in 2 pieces , I like them not to be the same width, and will add a stripe of my front fabrics between them. I like the stripe of front fabrics not to end up in the middle.
My blocks are 12 inches and sewn in rows. I will pin one row of the quilt squares on my strip of batting , matching the edge that will be attached. Then I will pin them carefully and straightly onto the backing. I will have extra backing to deal with, but not much more than half of it and no extra batting so I believe my machine will have enough space to do what ever quilting I desire. If I stipple, I won’t get closer than an inch of the joining edge and the edge of the. Stippling will be uneven.
Once I have done the first row, I will add the next row of blocks sewn in a row with a 1/4 inch seam to just the first row of blocks and press the seam open. I will lay out the whole kit and kaboodle and butt the next row of batting between the block strips and backing and tack it to the first row of batting without overlapping the pieces of batting. Then I can quilt that next row of blocks, after pinning it securely of course.
Continue adding rows as long as the backing piece lasts. When I get close to the backing being gone, I will sew on the special stripe and continue as above. When that piece of backing runs out, I will sew on the 3rd and continue til done.
All that is left will be to trim and add a binding. I do hope this is far clearer than mud!
I like this idea, if I understand how it is going to look in the end. Do you not have any batting strips between the blocks, but butt them right up against each other? ANd the stripes that you add on when the batting runs out, are they making a design on the backing? Please answer directly to my email address as I probably will never find this exact location again to be able to read your reply here!! Linda
I love the tutorial. I am going to to this for sure.
I also like Elle’s idea.
Brilliant minds.
Your method is my method for a tradtional looking quilted-on-both-sides look. The 1″ margin on all the quilt blocks is the key. I join with 3/8″ seams, so 1″gives you a 1/4″ margin that makes it less likely for finger damage from the sewing machine needle.
The whole quilt looks GORGEOUS!
Ive never done a QAYG quilt …Perhaps I should stick it on my list for this year ….
Great looking quilt doing it your way. Thank you SO much for doing this tutorial. That took you a lot of typing so I didn’t want to read this and not at least say thank you because that took you a long time away from your adorable little dancing helper.
And even when you commented about your oops while showing the back in that one picture, I had to really stare to figure out what you meant so it was not as noticeable as you thought it might be. Of course, others may be much smarter than I am since I’m relatively new at quilting, or consider myself to be at this point yet.
Wow thanks so much for such a detailed comprehensive tutorial.
Great tutorial, really well explained and lovely photos. I feel that I could do one of those quilts too! Thanks Kat I think that quilt on my WIP list for my hubby is definitely going to get done before winter this year , he will be happy 🙂
Love this tutorial – qayg seems much more manageable now I’ve read this. Your quilt is stunning 🙂
whoa! seriously? this is GENIUS! i loooooooove a good quilt and i’ve been wanting to finally make a really nice family heirloom kinda piece to go on our queen bed but the quilting has kept me from doing so. i’ve made a bunch of smaller quilts but my machine is tiny and there’s no way i can quilt a whole queen sized quilt on that thing. wooohoooo!! now i finally get to make my ginormous hexagon quilt. i’m stoked! thank you so much!!
Kat, this is a fantastic tut. I have been sitting on the blocks I have cut out for a queen size quilt because I just knew how awful quilting it was going to be even though I have a machine with a nice big neck. I am now inspired to unpick the couple of rows I have pierced together and use this method instead – brilliant thank you!
I had to comment… I’ve seen a few QAYG tutorials out there, but you’ve managed to answer ALL of my questions. Thank you for not skimping on the details and photos. You rock! (Go ahead, tell your friends 🙂
Loved this – been wanting to do a larger quilt for our queen bed and this would be perfect – enjoy your writing style too!
I have been very interested in making my first quilt. I’ve been thinking that this could be done. So glad you posted on how to do this. Since I do not have a quilting foot and do not know how to quilt the top, this would be perfect for me!! Thanks so much!
Enjoyed your ides, plus the step by step. I’m going to QAYG with the batting on from the beginning. (Have seen that tecnique on you tube, but they did entire block sandwich.).Then pieced the blocks together with strips.) So I’ll do a combination of the two and hopefully it will turn out great! I like your idea a lot & love your commentary, makes me smile! Thank you for sharing. Please keep the great ideas coming!!! 🙂
You inspired me so much with your quilt. I think I finally found a pattern that will work well for my daughter. Thank you so much for your detailed information on how to do it!
I have used this technique and love it. The one thing I sometimes add, if my blocks are massive or large; I do a large zig zag across the opened up ironed seems. It seems to lay down the bulk a bit.
Thanks so much for sharing this info with us all…..I will definitely be a very happy quilter as I launch into my first QAYG using this tutorial
Just found this on Pinterest and love the tute! Your sewing style seems a bit like mine. 😛 I wish I’d seen this before I made my gigantisized king size for my bed. It’s not finished yet, still needs borders and I plan to simply hand tie it with yarn, the way my grandma taught me. Getting ready to make some others though so I think I will give this a go for sure! Thanks again!
great tutorial and very detailed!
I love this. I have a love/hate relationships with quilting. I always want to quilt cool designs on mine but when I get it in the machine to do the middle it’s so much buntchiness that I normally stitch in the ditch. I am definalty going to try this and finally make a new quilt for my extra bedroom. Thank you!
I want to try this one day. Thanks great job. I love that all the people sent you blocks how special!
Stephanie
Thanks Kat for the tutorial and a few laughs, this is truly a short cut to all the quilting pushing and pulling on the sewing machine. I most certainly will be using these steps on my next quilt. Wishing you and your family a very Merry Christmas.
I really wish I knew this before! This is great, will be following for more tips like these!
I cannot wait to try this! I’ve made several lap-sized quilt as you go quilts, but this full-size qayg method sounds and looks very do-able for this beginner sewer who is easily overwhelmed by sewing patterns and instructions. Thanks for sharing! I hope you post that binding tutorial soon. I’ve done my own binding in the past, but something tells me you’ll have several tips to make it easier…and less intimidating!! Happy Quilting!
Hey this was great! I have been quilting forever and learned the “right way” but tend to change my method to whatever suits me or the project (and I generally dont like rules or being told it has to be done one way)… so this is an excellent thinking outside of the box idea. I also really loved the quilt and colors and I have been dying to get my hands on that goldfish in a bag material for a good 8 years or so… but then that would lead to more projects and a possible marital crisis in the future haha. I am presently in the middle of a massive king size quilt that this would have been pretty brilliant for (I am unfortunately forced to quilt it by hand as its too massive to go through my machine and im too cheap to pay to have it done… cuz… um… thats cheating imo)… anyways! I have another quilt coming up that I have been working on for about a year now (mixed embroidery/applique… hence the snail pace) and mulling over in my head for 3/4 of that time how I plan to quilt it… I think thats whats keeping me from forging ahead with it… THIS is going to be excellent for it… I’m excited to try it! Thanks for sharing and excellently laid out and explained instructions!
Popped over from a link on Pinterest…love your site and this quilt technique. Thanks for sharing!
This comment has been removed by the author.
Obrigada por compartilhar… linda sua colcha…
You sound like my kind of sewer. Love the laughs too.
i’m going to do this.
Txs
I love this concept. I am making a twin size quilt that has borders around the squares. Can I use this technique with that kind of quilt? It’s the Petal Pop Quilt by Art to Heart.
Tip for people who quilt: DON’T ALWAYS USE ALL PATTERN MATERIAL–It makes THE QUILT LOOK TOO BUSY. Use some solid fabrics as well
VERY interesting idea! This would be ideal for a quilt that I am going to keep for myself. I actually have a stack of wonky log cabin blocks that I plan to use quilt as you go with them. I just might end up using this technique. Thanks so much for sharing and taking the time to explain so well what you did and why.
OHHH THANK YOU THANK YOU THANK YOU…Doing this tonight for a largish quilt that has been sitting in pieces in a pile waiting to be not so intimidating anymore..
Thank you for putting up this tutorial! I have done small projects but just avoid anything big for the fear of quilting it or paying someone to quilt it for me.
thanks so much for posting this and with really clear photos! Im going to try this!
redjanfan@gmail.com
BELISSIMO TRABALHO
MUITO OBRIGADA P SUA GENEROSIDADE DE MOTRAR P TODAS NÓS
MUITA SAUDE, E SUCESSO P SUA VIDA
BJINHOOOOOOO
I’m considering doing a quilt I’m finishing piecing as a QAYG and wondered if you had any problem with the batting being stitched directly on your machine’s plate?
Cannot wait to try!! Thanks so much!!!
I just love short cuts. that was so clever. would love to try one myself.
made one the “proper” way, but still have to get it batted, backed and quilted – ugh – huge job ! thanks !
cleverrrr! short cuts are my fav.
I am so glad I found this tutorial. I made quilts for 4 of my grandkids for Christmas, but I had one more to do. He is still little so I am working on it now. I finished all the blocks and was trying to figure out a better way to quilt them than the first four. This is perfect. I am off to finish that quilt.
Really enjoyed your tutorial! Going to use it starting tomorrow. Love the comments you make along the way, keeps it happy to read. Keep them coming. 🙂
I liked your in depth tutorial for qayg . It sure will be worth a try. Thank you
I found your tutorial searching for QAYG quilts. I have found another way to do these squares. When you sew the squares together, you include a 1 1/2″ finishing strip in each seam allowance across. Then you flip the finishing strip across the raw edges and hand stitch. When you sew the rows together, you include a 1 1/2″ finishing strip and hand sew that, too. No additional fabric and pinning required. I have made multiple quilts this way and even teach classes on the method. So much simpler.
Thank you so much for this fantastic tutorial! I really want to make a queen size quilt, but have always been too scared of the quilting. Now I think I could manage it your way. 🙂
Your tutorial is so wonderful!! Loved your succinct instructions with lots of photos! And I love your quilts! Thank you for taking your time to give us this great tutorial…you made it seem so simple, I’m ready to give it a go!
My QAYG project was done in almost the exact same way. I used no backing for each block and once all my blocks were sewn together, I used an IKEA sheet for the backing. And to avoid as much bulk in the seams as possible, I used a lightweight fusible stabilizer to keep my seams as flush as possible. Mine was generous twin size. Love how yours turned out!
Cheers!
Thanks for this tutorial! This seems like the simplest QAYG method I have seen. No fiddling with little strips and all that hand sewing on the back! This seems doable for me – a great way to make a queen size quilt on my little Bernina. 🙂
Wow…I see I’m about two years late to this post…but what fantastic information!!
Good job!! Easy to understand and not persnickety!! And it doesn’t have to be PERFECT!
Thank you!! My kind of quilting!!
Melisa H.
This is a really good tutorial – I love your style.
This looks so easy and fun, I want to do it NOW. Thanks for the inspiration!
I really like your QAYG method. Is there any problem stitching in the ditch when the seams are pressed open? It seems like I’d be stitching over thread instead of fabric. I’m sure I’m missing something, but would like to hear your opinion. Thanks for a great tutorial.
Great blog! I just wanted to let folks know that your method is the bomb! I made a String King Size Quilt and had no problem quilting it since it had been quilted as I go. I sewed my string strips directly on squares of batting, ironed and squared them up, sewed them together with half inch seams. I did baste from the front and sewed on both sides of the seams for the quilting. It’s addictive and the most fun quilt I’ve made.
Give it a try everyone. You will enjoy the whole process.
I love your quilt it’s so beautifull I hope one day I can make one like it. Just gorgeous.
This is fantastic. I was facing a very daunting quilting process on my desk and it was scary lol I really just want to make every layer including the backing just like this because of space. Then just add the binding.
What a great tutorial! Well written, humorous and clear instructions. I look forward to more tunes from this author.
Step 9 seems to involve a lot of bulk under the sewing arm, which is always my difficulty in quilting a full size quilt using a regular sewing machine. I don’t see how to accomplish that since you are quilting in the ditch for each row.
Just came cross your Tutorial. Great information! Will try soon. I’m just a so “no waste” person and make many Jean quilts so instead of using paper to mark the pieces at the top of each row I just stack them with a twist. One row straight the next with the corners to the straight side and so on. When having to press seams open or to the side on material that tends to stick to my iron I use an open weave or gauze press cloth or my silicon press sheet both of which you can see through. These come in different sizes so I use the one that best fits the block and the bottom of my iron.
.
Very interesting reading, thanks! Now I can’t wait to make one of my many stacks of quilt blocks into an actual usable quilt. It seems so much more manageable to do it your way and you may have just given me the confidence to do it!
J aime beaucoup ce tutoriel. Excellente idée!
Je vais essayer de l’appliquer
A bientôt
Patricia
I did trying making a lap size Quilt with the QAYG technique nearly successfully for a first try but I wish I knew some of these tips then, for a start I sewed my blocks together with 1/4″ seam allowance (ironing was hell and my iron did suffer). 1/2″ wasn’t an option cos it was a star block and I didn’t want to lose my points…lesson learnt, next time put a border around my star block or leave a generous seam allowance around my block. Thanks a lot for the Tutorial, I shall try these tips on my next project which is a Queen size.
Thanks SO much for your fabulous tutorial! It was loads of help! Last February, I began my first QAYG project – a queen sized quilt for my bed. One day, I happened upon a huge stash of adorable fabric at a thrift store, and just HAD to make a twin quilt for my little girl right then! Using your tutorial, I completed that sweet little quilt, and I LOVE it! The only thing I really did differently was to spray baste the backing onto it, instead of using pins. I tried first with pins, but the fabric bunched when I tried to quilt it on my machine. Spray basting worked fantastically! I wish I could post a picture! I am now nearly finished with my queen sized quilt. Thanks again!
Great tutorial! I used this method recently and it worked just fine! But instead of doing just one block at a time, I did a column of blocks at a time [stitch and flip to the batting]….. sort of like 3 table runners….my machine didn’t seem to mind. Then I trimmed and joined the 3 columns together, just as you did….added a narrow border and did a ‘quick turn’ with the prepared backing. Thanks!
About the “fluffies” . . . place a piece of paper underneath the block, so the paper is between the feed dog teeth and batting and stitch away. The paper tears away and you have saved your machine from the fluffies. Any paper will do – computer paper, notebook paper. kids homework (NO crayon!), junk mail paper, etc. I’ve used it all and it’s all good . . . well, except not newspaper – too thin.
BTW, this also works when doing machine applique. No need to buy expensive iron-on backing. It’s all about the paper.
Thank you for the tutorial. I have been looking for one for a while now, going to try this today.
Love the quilt. Great tutorial.
Really useful and well written “tute”. Thank you. Can I ask why you didn’t spray baste the backing on and used pins instead? Earlier in the article you mentioned that you were ok with spray basting (as am I – so much easier and washes out anyway).
I love the idea of using up scraps and building stacks of blocks. I love quilting as you go. I don’t like the plain back. I’d like to have the back quilted as well. Will see if I can expland on this idea. Thanks for the inspiration.
Nice! I made a similar quilt a few years ago. I did not use batting, just fluffy fleece at the back. Yours is way bigger than mine, what a great way to make a huge quilt. Thank you for sharing. I’m pinning this.
I see you stitch in the ditch, but isn’t there only stitching holding this together (the seams) are you stitching down the stitches that are there. I am concerned that this will come apart, since you are only stitching the thread stitches. I would rather do a double row of stitching so it catches the fabric and not just the stitches. Am I seeing this different. Just not sure how sewing stitches can keep this together sewing on them only and only to the backing.
I loved your tutorial. I have made several quilts but since I do t have a quilting frame ,the backs are never smooth and it just bothers me, even if you don’t see it. I’m not a pin person either or super fastidious. This causes me a bit of problems. I’m more excited about finishing the top than adding a back. Lol but I’m going to try your quilt as you go method. I love that you can get a smooth finish because you can feel the quilted squares beneath. Thank you so much!
Thank you! I am part of a childrens quilt ministry and as the kids advance they want real quilting and this will mke it possible! I am excited to teach them this!
we teach children and adults of all ages how to quilt and the projects are given to police and other agencies to comfort children in crisis.
I’m so glad I found this!
I sew on a home -Singer- machine and have wondered about the QAYG concept.
Sounds great & easy, too! I can’t wait to try it!
I’m a follower of yours on BlogLovin, now.
Thanks for the great post!
I’m not a quilted, but I’m pretty crafty….I absolutely love your tutorial! I think I will actually try your method as I’d like to make a quilt for my son and his wife to be. My idea is to use photographs from the time they were babies through their growing up, to today and copy the photos onto fabric. Then quilt around the photos and ultimately piece them together.
I think your QAYG method is perfect for my project. Please…if you have any suggestions, I welcome them. I hate to admit it, but I also have a lazy tendency. Thank you for posting your tutorial!
J’ai bien aimé très beau merci
What a wonderful explanation of the process! You have a real talent to teach! Thank you
Oh goodness gracious I am so excited that I have found an EASY way to make a queen size quilt!! I love your writing style also. Can’t wait!! Thanks so much <3 Can't wait until I get the gumption to get one going 🙂 Best tutorial!
Thank you for posting this – this sounds like the perfect solution for me!! I am a new-ish quilter and have thought there has to be an easier way to accomplish king size quilts. I will try your method FOR SURE. I also appreciate your sensibility about not getting so fussy and crazy with things. So not an OCD type of person, but really like the look of quilts and the ability to customize them to my taste by making them myself. Much more of a product person than a process person in all things, garment sewing, quilting, knitting, it goes on. Thank you again!
I love the fact that you don’t have to do a sashing between the squares. Every other QAYG tutorial I have seen requires that narrow strip of fabric!
I found this tutorial on Pinterest and am very glad I did.
I am doing my first quilt-as-you-go quilt at the moment after decades of quilting. It is raw edge applique which I have not done before, and I am enjoying the freedom of quilting a block at a time and varying the quilting from block to block.
But with this I can use the more traditional blocks I love and still do the quilt as you go. Brilliant.
I will definitely use this technique on my next QAYG project. Thank you for a well written, humorous tutorial.
Can this method be used with any quilting pattern? I have a book on the method where you hand sew the backing to one side of each block but this would be MUCH easier and faster ! Thanks 🙂
Great tute , yes we are finding this even after ? 5 years and still learning from your entertaining teaching method. Thank you for making this method easy to follow with all your pictures and clear instructions. I have only made 5 quilts so still feel like a newby …. Take care and thank you again .
Just the tutorial I was looking for. I have been making rag quilts and now want to attempt a quilt that looks nicer but not “so involved” and more to my capability. At least I know I should be able to finish it.
“
Hi, beautiful , I love it…Thanks for sharing..
Love love love it. Going to do a baby quilt with this technique Thanks for this tutorial ?
Hey there, love the tutorial. I actually have done this to a number of quilts. The only difference is I use spray baste the backing on too and I quit spraying the front down because like you say it didn’t seem to matter. I was looking at Angela Walters’ blog and she says when she is quilting on a sit down machine she uses steam a seam lite fusable instead of pins. I was going to try that one next… just have to figure out how to iron it down without wrinkles or destroying floors or counters etc
+I love this way of one block at a time, I like to do hand quilting, it is much easier this way I can do one block at a time and take it with me. thank you so much.
Thank you so much for both the tutorial (which is amazing!) and your attitude (which is even more amazing!). I tend to sew very much in this style and have always found quilting to be very stressful because of the “rules”. Your way seems to work out so well and still be stress free, so thank you!!!
And now it is 2017 and your instructions are still super appropriate! I love your commentary and appreciate your whole post. Many thanks from SE Texas!
What do mean by sewing in the ditch. This method sounds so easy.
I’m just trying to teach myself How to quilt, so how do you know how much batting and backing and muslin to buy? And how big to make the squares? Thank you for your instructions, they seem pretty easy to follow.
First: You mentioned no sheet for cooler weather, Did you know? The fancy high thread count sheets are often very warm because they don’t ‘breath’ like lower count. Often, also, the high thread count uses very thin thread to achieve the high count!
Second: Many people say they can’t quilt on their home machines. Are you rolling you quilt up tight to fit it in the arm hole of your machine? You only need to go from the center out, so only 1/2 your quilt is in that space at a time. I’ve seen tutes on Pinterest that use pool noodles for this purpose. There are skinny noodles and those that are thicker. For swimming thicker is nice, but for rolling up quilts thinner is better.
Brilliant.
thank you
Thanks for the timeless information and for being on Pinterest.
Thank you so much, i make small quilts for charity, this will make it so much easier. regards Elly
Thank you for so much detail, It gives me the courage to make a scrappy quilt and use up a lot of pieces that I wasn’t sure I could use. But I will start with making the patches, log cabins as well as free styles. It may take me a while but It will be in the works. Thanks again for your time and effort to share.
I just read how you put a quilt together. I love it. Except I am going to change by taking my quilts to a shop to be quilted. The only reason is I have two small dogs who goal in life is to help mom. They are on my sewing machine table.
Great tute! Here’s a tip from me. When my two layers [top and batting] are finished, I add my backing [cut to size] and do a ‘quick turn’ by sewing all around the perimeter of the quilt, right sides together. Leave a 10 to 12″ opening at the bottom or one side. This attaches the back to the other two layers. Turn it right side out. Hand-stitch opening closed. Admire your work!
Hello! I like your instructions as well as the pictured steps. I have been looking for a video that is basicly easy in quilting as you go with top, batting, and back and how to do sashing. My blocks are 12 1/2 in without sashing. Sash is to be 2 in between and boarder will be 2 colors. One 2 1/2 & 3 1/2 . I can not find anyone who quilts as you go with 3 layers. So I an going to chance it.
Jacque Caron Tc Mi
Thanks for sharing this tutorial. I am about to attempt my first QAYG quilt and have researched quite a few sites on this subject. Yours is the best tutorial I have found for me. It is simple, straight-forward and easy to understand. I will also use this for my 4-H sewing club this winter so they can make a lapquilt for community service project.
I am a huge fan of quilt as you go and have made quite a few quilts using that method, but you blog is absolutely the best I have seen. Congratulations.
Sylvia Martin
Fab tutorial and the easiest QAYG method I've come across. I will certainly give it a ho, thank you